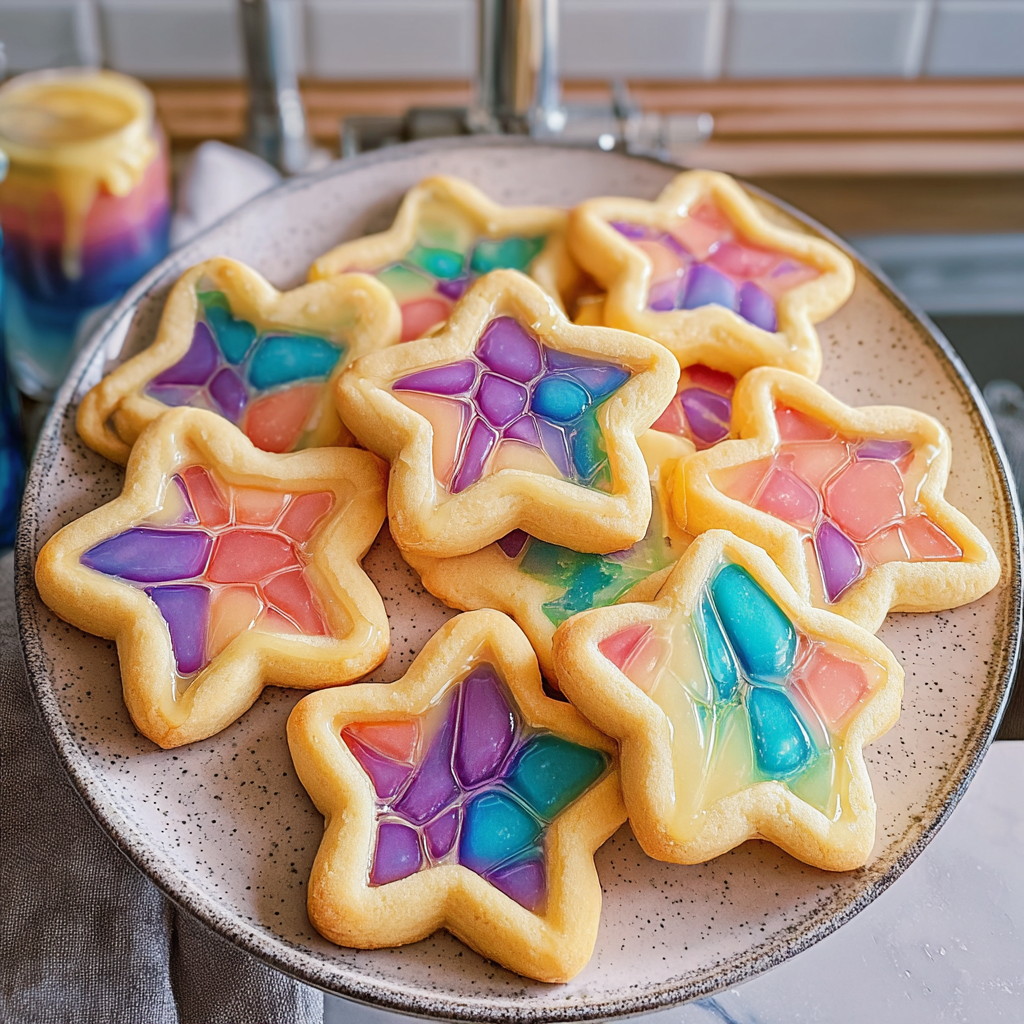
Stained Glass Window Cookies are not just a treat; they are a vibrant explosion of color and flavor that can brighten up any dull day. Picture this: you take a bite, and your taste buds get hit with the sweet kaleidoscope of flavors, all wrapped in a buttery, crumbly cookie. The crunch of the transparent candy center adds an irresistible texture. These cookies truly are a feast for the eyes and the palate, making them perfect for any occasion.
Now, let me take you down memory lane. I remember the first time I made Stained Glass Window Cookies with my grandma. We spent an afternoon surrounded by flour, laughter, and a sprinkle of chaos (mostly from me sneaking extra candy pieces). As we cut out those colorful shapes, the kitchen filled with warmth and love. These cookies became our holiday tradition, and every bite brings back fond memories of time spent together. Whether it’s Christmas, birthdays, or just because you want something pretty to eat, these cookies are always a hit!
– Easy to make with simple ingredients that anyone can find at their local grocery store.
– A delightful blend of buttery cookie and sweet candy that will please kids and adults alike.
– Visually stunning with vibrant colors that look gorgeous on any dessert platter.
– Perfect for various occasions—holidays, parties, or just a cozy afternoon snack.
Ingredients for Stained Glass Window Cookies
Here’s what you’ll need to make this delicious dish:
- All-Purpose Flour: This forms the base of your cookie dough. Make sure it’s fresh for the best results!
- Unsalted Butter: Use softened butter to create that melt-in-your-mouth texture everyone loves.
- Sugar: Granulated sugar adds sweetness to balance the flavors perfectly in each bite.
- Eggs: Eggs bind everything together while adding richness to the cookies.
- Vanilla Extract: A splash of vanilla enhances the overall flavor profile—always use pure if you can!
- Candy (Jolly Ranchers or similar): Choose colorful candies to create your beautiful stained glass effect; they will melt beautifully in the oven.
The full ingredients list, including measurements, is provided in the recipe card directly below.
How to Make Stained Glass Window Cookies
Follow these simple steps to prepare this delicious dish:
Step 1: Preheat Your Oven
Preheat your oven to 350°F (175°C). Line two baking sheets with parchment paper. This will help prevent your delightful creations from sticking.
Step 2: Prepare Your Dough
In a large bowl, cream together the softened unsalted butter and granulated sugar until light and fluffy. Add in one egg and vanilla extract, mixing well until combined.
Step 3: Combine Dry Ingredients
In another bowl, whisk together all-purpose flour and a pinch of salt. Gradually add this mixture into your buttery goodness. Mix until just combined; don’t overdo it!
Step 4: Roll Out Your Dough
Lightly flour your work surface and roll out half of your dough to about a quarter-inch thick. Use cookie cutters in fun shapes—stars or hearts work perfectly.
Step 5: Cut Out Centers
Using smaller cookie cutters or even a knife, cut out centers from each shape to create windows for those colorful candies.
Step 6: Add Candy
Fill each opening with crushed Jolly Ranchers or similar candies. Don’t be shy—these are what turn your cookies into edible stained glass!
Transfer the baking sheets to the preheated oven. Bake for about 10-12 minutes or until lightly golden around the edges.
Let them cool on wire racks before serving them up on a plate that says “I’m fabulous.” Trust me; once you bite into these Stained Glass Window Cookies, you’ll be transported back to those warm kitchen moments—or creating new ones!
Perfecting the Cooking Process
To ensure your Stained Glass Window Cookies come out perfectly, start by preparing your dough and chilling it. Roll out the dough while preheating the oven. Once shaped, bake them until golden brown while you prepare the colorful candy centers. Efficiency is key!
Add Your Touch
Feel free to personalize your Stained Glass Window Cookies! You can swap out the traditional candies for fruity gummies or even chocolate pieces. Spice it up with a hint of cinnamon or lemon zest for a unique flavor twist. The world is your cookie canvas!
Storing & Reheating
Store your Stained Glass Window Cookies in an airtight container at room temperature for up to one week. If they lose some crunch, pop them in a 300°F oven for a few minutes to refresh their delightful texture.
– Use parchment paper on your baking sheets to prevent sticking and ensure easy clean-up.
– Don’t overbake! Keep an eye on the cookies; they should be lightly golden around the edges.
– Experiment with different colored candies to create festive designs for various occasions.
When I first made these cookies, my niece exclaimed they looked like edible art! It melted my heart seeing her so excited to eat something we crafted together.
FAQs:
What are Stained Glass Window Cookies?
Stained Glass Window Cookies are delightful treats that feature colorful, translucent centers resembling stained glass windows. These cookies combine a classic sugar cookie dough with crushed hard candies placed in the center before baking. As they bake, the candies melt and create vibrant, glass-like designs. These cookies are perfect for holidays, special occasions, or just a fun baking project with kids.
How do I make sure my Stained Glass Window Cookies turn out perfectly?
To achieve perfect Stained Glass Window Cookies, ensure you chill the dough before rolling it out. This step helps maintain their shape during baking. Use fresh candy for vibrant colors and flavors. Be cautious not to overbake; aim for a light golden color around the edges while keeping the center slightly soft. Allow them to cool completely on a wire rack before serving.
Can I customize my Stained Glass Window Cookies?
Absolutely! You can customize your Stained Glass Window Cookies by using different shapes for your cookie cutters or experimenting with various hard candy colors and flavors. Consider adding spices like cinnamon or nutmeg to the dough for an extra flavor twist. For festive occasions, use seasonal shapes such as stars or hearts to enhance their visual appeal.
How should I store Stained Glass Window Cookies?
Store your Stained Glass Window Cookies in an airtight container at room temperature to maintain their freshness. They can last up to a week when stored properly. If you want to keep them longer, consider freezing them. Place layers of parchment paper between cookies in a freezer-safe container to prevent sticking and enjoy them later!
Conclusion for Stained Glass Window Cookies:
Stained Glass Window Cookies offer a creative and tasty treat that’s perfect for any occasion. By following simple steps and customizing flavors or shapes, you can make these cookies uniquely yours. Remember to chill the dough and use fresh candies for the best results. Whether you’re sharing them at gatherings or enjoying them with family, these beautiful cookies are sure to impress!
Stained Glass Window Cookies
Stained Glass Window Cookies are a delightful treat featuring colorful candy centers that resemble beautiful stained glass, perfect for adding cheer to any occasion.
- Prep Time: 20 minutes
- Cook Time: 12 minutes
- Total Time: 32 minutes
- Yield: About 24 cookies 1x
- Category: Dessert
- Method: Baking
- Cuisine: American
Ingredients
- 2 ¾ cups all-purpose flour
- 1 cup unsalted butter, softened
- 1 cup granulated sugar
- 1 large egg
- 2 tsp vanilla extract
- A pinch of salt
- 1 cup crushed hard candies (e.g., Jolly Ranchers)
Instructions
- Preheat Your Oven: Preheat your oven to 350°F (175°C) and line two baking sheets with parchment paper.
- Prepare Your Dough: In a large bowl, cream together the softened butter and granulated sugar until light and fluffy. Add in the egg and vanilla extract, mixing well until combined.
- Combine Dry Ingredients: In another bowl, whisk together the all-purpose flour and salt. Gradually add this mixture into the butter-sugar mixture until just combined; avoid over-mixing.
- Roll Out Your Dough: Lightly flour your work surface and roll out half of your dough to about a quarter-inch thick. Use cookie cutters to cut fun shapes—stars or hearts work perfectly.
- Cut Out Centers: Use smaller cookie cutters or a knife to cut out centers from each shape to create windows for the candy.
- Add Candy: Fill each opening with crushed hard candies. Don't hold back—these will transform your cookies into edible stained glass!
- Bake: Transfer the baking sheets to the preheated oven and bake for about 10-12 minutes or until lightly golden around the edges.
- Cool and Serve: Allow cookies to cool on wire racks before serving them on a lovely plate.
Nutrition
- Serving Size: 1 cookie (30g)
- Calories: 130
- Sugar: 10g
- Sodium: 50mg
- Fat: 6g
- Saturated Fat: 4g
- Unsaturated Fat: 2g
- Trans Fat: 0g
- Carbohydrates: 18g
- Fiber: <1g
- Protein: <1g
- Cholesterol: 20mg