Intro and Brief Recap
Have you ever craved the delightful layers of a Dairy Queen ice cream cake? This copycat Dairy Queen ice cream cake recipe brings all those nostalgic flavors right to your kitchen. With its creamy ice cream, rich chocolate fudge, and crunchy cookie crust, every bite transports you to a summer celebration filled with laughter and joy.
This cake is perfect for birthdays, family gatherings, or simply as a sweet treat to share with friends. The combination of textures—from the smooth ice cream to the crunchy crust—creates an irresistible dessert that will make everyone smile. Plus, making it at home allows you to customize the flavors and ingredients to suit your taste. Imagine indulging in this decadent delight while reminiscing about fun-filled days; it’s an experience not to be missed!
Key Ingredients For copycat dairy queen ice cream cake
Here’s what you’ll need to make this delicious dish:
- Chocolate Cake Mix: Use a standard box mix for convenience, or make your favorite homemade chocolate cake recipe for a richer flavor.
- Ice Cream: Choose your favorite flavors; vanilla or chocolate work well for layers but feel free to mix it up!
- Chocolate Fudge Sauce: This adds a deliciously gooey layer; opt for store-bought or homemade if you’re feeling adventurous.
- Oreo Cookies: Crushed Oreos create a delightful cookie crust that pairs beautifully with the creamy layers.
- Whipped Topping: Use whipped topping for easy decoration; it gives the cake a lovely finish.
The full ingredients list, including measurements, is provided in the recipe card directly below.
Instructions For copycat dairy queen ice cream cake
Follow these simple steps to prepare this delicious dish:
First Step : Prepare the Cake
Preheat your oven according to the instructions on your chocolate cake mix box. Grease and flour two round cake pans. Prepare the cake batter as directed and evenly distribute it between the two pans. Bake until a toothpick inserted into the center comes out clean, which usually takes around 25-30 minutes.
Second Step : Cool and Level Cakes
Once baked, remove the cakes from the oven and allow them to cool in the pans for about 10 minutes. Carefully turn them out onto cooling racks. Once completely cool, use a serrated knife to level off the tops of each cake if necessary, ensuring they stack evenly.
Third Step : Create Cookie Crust
In a mixing bowl, crush Oreo cookies into fine crumbs. Combine them with melted butter until well mixed. Press this mixture firmly into the bottom of one of your cooled cakes, forming an even layer.
Fourth Step : Layer Ice Cream
Scoop softened ice cream onto the cookie crust layer and spread it evenly across. If using multiple flavors, alternate scoops for a fun look! Freeze this layer until solid, approximately 1-2 hours.
Fifth Step : Assemble Layers
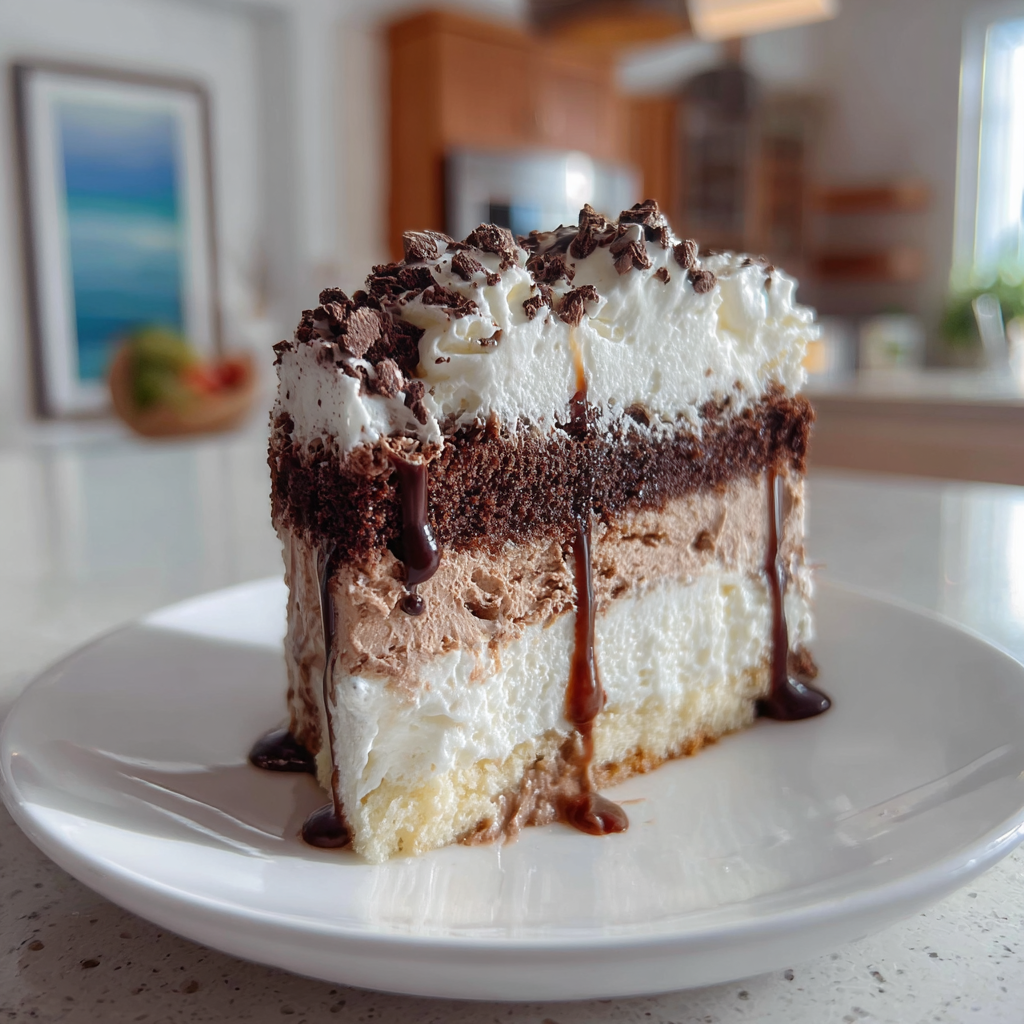
Once frozen solid, place the second leveled chocolate cake layer on top of the ice cream layer. Drizzle warm chocolate fudge sauce over the top and spread whipped topping around the sides for decoration.
Transfer to plates and enjoy this delightful homemade treat with family and friends!
Expert Tips
Here are some helpful tips to ensure the best results for your dish:
- Soften Ice Cream First: Letting ice cream sit out for about 10 minutes before spreading makes it easier to work with.
- Chill Your Cake Pans: Chilling your empty pans before adding batter can help prevent sticking.
- Use Quality Fudge Sauce: A good quality fudge sauce enhances flavor; consider making it from scratch if time allows.
Preparation Steps
Begin by gathering your ingredients for this copycat dairy queen ice cream cake. Start with a base of chocolate or vanilla cake layers, depending on your preference. Prepare the cakes according to the recipe instructions and allow them to cool completely. Once cooled, slice each layer in half horizontally to create thinner layers.
Next, soften your favorite ice cream slightly to make it easier to spread. Layer the first piece of cake on a serving platter and spread a generous layer of softened ice cream on top. Add any desired mix-ins like crushed cookies or candy pieces for extra flavor. Place the second layer of cake on top and repeat the process with more ice cream and mix-ins.
Continue stacking until you reach your desired height, finishing with a final layer of ice cream on top. Use a spatula to smooth out the ice cream for an even finish. For added decoration, consider drizzling chocolate or caramel sauce over the top.
Freezing Your Cake
Once you have assembled your copycat dairy queen ice cream cake, it is crucial to freeze it properly. Cover the cake with plastic wrap or aluminum foil to prevent freezer burn. Allow it to freeze for at least 4-6 hours or overnight for best results.
This freezing process helps the layers set firmly, making it easier to cut and serve later. Just before serving, you can add whipped cream around the edges and sprinkle some additional toppings like chocolate shavings or sprinkles for an appealing look.
Serving Suggestions
When it’s time to enjoy your copycat dairy queen ice cream cake, slice it into generous pieces using a sharp knife dipped in warm water for clean cuts. Serve each slice alongside fresh fruit or additional toppings if desired.
This dessert works wonderfully at birthday parties or family gatherings due to its fun presentation and delightful flavors. Pair it with a side of hot fudge sauce for an indulgent treat that everyone will love.
Presentation Ideas
This copycat dairy queen ice cream cake is versatile and pairs wonderfully with:
- Fresh Berries: Strawberries, raspberries, or blueberries add a refreshing contrast.
- Chocolate Sauce: Drizzling chocolate sauce enhances its decadent flavor.
- Sprinkles: Colorful sprinkles bring joy and excitement to every slice.
FAQs
What flavors can I use for my copycat dairy queen ice cream cake?
You can customize your copycat dairy queen ice cream cake by choosing various flavors of cake and ice cream. Popular combinations include vanilla cake with chocolate fudge ice cream or chocolate cake paired with cookies and cream ice cream. Feel free to experiment with different flavors according to your taste preferences!
How long does this copycat dairy queen ice cream cake last in the freezer?
Your copycat dairy queen ice cream cake can last in the freezer for about two weeks when properly wrapped in plastic wrap or aluminum foil. To maintain its freshness, ensure that you cover it tightly before placing it in the freezer. For best quality, try consuming it within one week after preparation.
Can I make this recipe gluten-free?
Absolutely! To make a gluten-free version of your copycat dairy queen ice cream cake, simply use gluten-free flour when baking the cake layers. Additionally, check that any other ingredients such as toppings and mix-ins are also gluten-free certified.
Is there a way to make this dessert healthier?
Yes! You can lighten up your copycat dairy queen ice cream cake by using low-fat or sugar-free versions of both the cake mix and ice cream. Incorporating fresh fruit as toppings instead of candies can also add natural sweetness while reducing calories significantly without sacrificing flavor!
Copycat Dairy Queen Ice Cream Cake
Craving a nostalgic dessert? This copycat Dairy Queen ice cream cake brings the joy of summer celebrations right to your kitchen. With layers of creamy ice cream, rich chocolate fudge, and a crunchy Oreo crust, every bite is a delicious reminder of childhood treats. Perfect for birthdays or family gatherings, this customizable cake allows you to mix and match flavors for an unforgettable dessert experience.
- Prep Time: 20 minutes
- Cook Time: 30 minutes
- Total Time: 50 minutes
- Yield: Serves 12 1x
- Category: Dessert
- Method: Baking
- Cuisine: American
Ingredients
- 1 box chocolate cake mix (15.25 oz)
- 2 cups vanilla or chocolate ice cream (softened)
- 1 cup chocolate fudge sauce
- 1 ½ cups crushed Oreo cookies
- 1 cup whipped topping
Instructions
- Preheat the oven as per cake mix instructions. Grease and flour two round cake pans, then prepare the batter and bake for 25-30 minutes until a toothpick comes out clean. Let cool.
- Level the cooled cakes with a serrated knife if needed.
- Combine crushed Oreos with melted butter and press into the bottom of one cake layer as a crust.
- Spread softened ice cream over the cookie crust and freeze for 1-2 hours until solid.
- Place the second cake layer on top of the ice cream, drizzle with fudge sauce, and decorate with whipped topping.
Nutrition
- Serving Size: 1 slice (150g)
- Calories: 320
- Sugar: 28g
- Sodium: 180mg
- Fat: 15g
- Saturated Fat: 8g
- Unsaturated Fat: 6g
- Trans Fat: 0g
- Carbohydrates: 43g
- Fiber: 1g
- Protein: 4g
- Cholesterol: 30mg